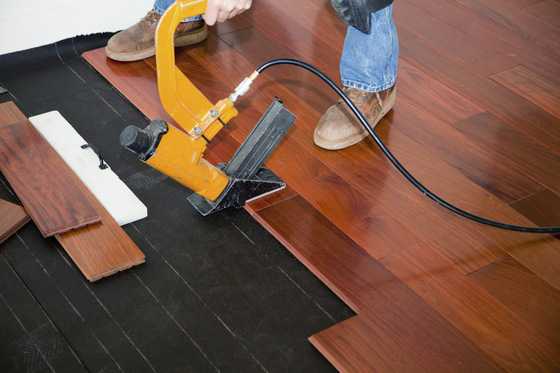
Diy Nail Down Hardwood Floor Tool Guide

How To Install Nail Down Unfinished Hardwood Floors Unfinished Hardwood Flooring Installing Hardwood Floors Wood Floor Installation

How To Nail Down Hardwood Flooring A Diy Guide Builddirect Hardwood Floors Installing Hardwood Floors Flooring

Engineered Wood Flooring Installation Guide Maintenance In 2020 Engineered Wood Floors Wood Floors Wood Floors Wide Plank

How To Install Nail Down Unfinished Hardwood Floors Wood Floor Installation Unfinished Hardwood Flooring Unfinished Wood Floors

How To Do Hardwood Floor Nail Down Installation Hardwood Types Of Wood Flooring Hardwood Floors

Tidbits From The Tremaynes Um Yeah He S Not A Fan Home Projects Plywood Floor Home Remodeling

How to remove nails from hardwood planks.
Diy nail down hardwood floor tool guide. With a nail down engineered hardwood floor follow the same subfloor preparation steps as above including underlayment and laying spacers around the room s perimeter to maintain the manufacturer s recommended expansion gap. Nail down staple down glue down and floating click. This installation method is identical to staple down only the fastener and fastening tool differ. Align the edge of the board with the chalk line and drill pilot holes down through the hardwood plank and into the sub floor and joist.
Most wood floors are secured with nails so along with your pieces of wood you ll have a lot of metal debris to collect. Pick one that is straight. Face nail the entire first row and remember. Engineered flooring can be installed above grade at grade and below grade level do not install hardwood flooring in bathrooms.
Begin by selecting a long board to start the first row. Pneumatic tools such as this nailer use compressed air to drive the fastener into position. The nails for pheumatic nailers are more expensive than traditional nails because they come in strips that feed into the nailer s rail assembly. Face nail each board at the point of every joist and set the nail with a nail set.
Solid hardwood flooring only can be installed on or above ground level with a plywood subfloor. If you are left with nails or staples in the subfloor now is the time to grab your nail claw tool and get to work. When learning how to install hardwood flooring it s important to understand that there are four basic types of installation.

Guide To Installing Laminate Flooring Installing Laminate Flooring Laying Laminate Flooring Laminate Flooring

Guide To Installing Laminate Flooring Laying Laminate Flooring Installing Laminate Flooring Laminate Flooring Diy

Pin On Project Vibes

How To Install Nucore Flooring Vinyl Wood Flooring Flooring Luxury Vinyl Flooring

How To Install A Floating Engineered Wood Floor Engineered Wood Floors Types Of Wood Flooring Installing Hardwood Floors

How To Install A Floating Engineered Wood Floor Engineered Wood Floors Installing Hardwood Floors Diy Wood Floors

Vinyl Plank Flooring Tutorial No Nails No Glue The Stone Head Vinyl Plank Flooring Flooring Flooring Tutorials

How To Install Laminate Flooring Installing Laminate Flooring Diy Flooring Flooring

How To Install Diy Glue Down Engineered Hardwood Flooring Installing Hardwood Floors Diy Hardwood Floors Diy Wood Floors

Diy Tips For Laying Floating Floors An Oregon Cottage Diy Hardwood Floors Laying Hardwood Floors Laying Wood Floors
Floating Floor Vs Nail Down Slaughterbeck Floors Inc

How To Install Hardwood Flooring Installing Hardwood Floors Hardwood Floors Flooring

Floor Sample Jpg 2 346 3 128 Pixels Diy Wood Floors Wood Floor Colors Refinishing Floors

How To Refinish Wood Floors In 2020 Refinish Wood Floors Wood Floors Old Wood Floors

A Guide To Installing Hardwood Flooring Do It Yourself Installing Hardwood Floors Mobile Home Makeover Living Room Redo
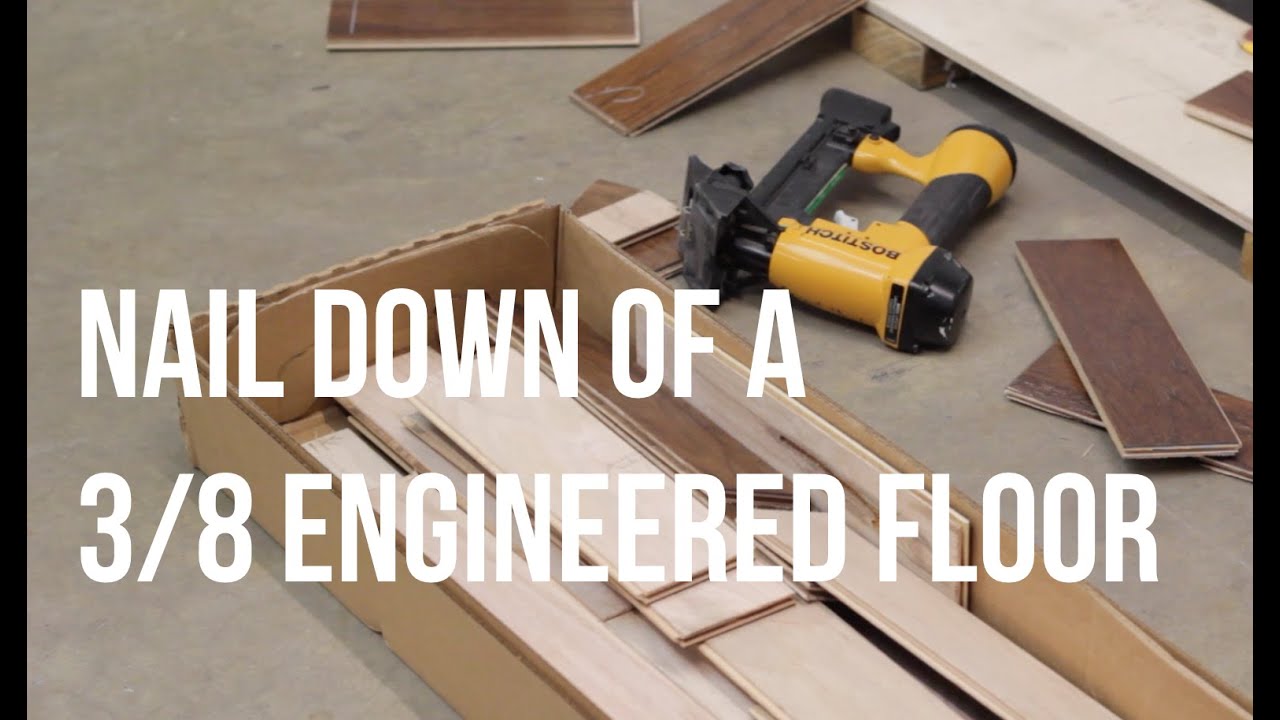
How To Nail Down An Engineered Wood Floor Reallycheapfloors Com Install Series Youtube

Installing Hardwood Floors Sand And Sisal Installing Hardwood Floors Diy Hardwood Floors Diy Flooring

Bischof Flooring Professional Hardwood Flooring Installation Wood Steps Wood Diy Flooring
3

Bathroom Floor Remodel Different Styles And Material Bathroom Remodel Installing Vinyl Plank Flooring Vinyl Wood Flooring Luxury Vinyl Plank Flooring

7 Ways To Silence Your Squeaky Floor Squeaky Floors Fix Squeaky Floors Old Wood Floors

Re Create This Interior Design With Our Antique Oak Hit Skip Wide Plank Wood Flooring And Decor From With Images Wood Floors Wide Plank Wood Plank Flooring Plank Flooring

Diy Plywood Plank Floors Plywood Plank Flooring Bedroom Flooring Cheap Plywood

How To Install Prefinished Solid Hardwood Flooring Prefinished Hardwood Solid Hardwood Floors Diy Hardwood Floors

How To Install Carpet Transition Strips Hunker Transition Strips Transition Flooring Carpet Installation
Hardwood Flooring Wood Floor Filler Trowelable Bad Hardwood Floor Installation Outdoor Wood F Prefinished Hardwood Flooring On Walls Installing Hardwood Floors

How To Install Floating Laminate Wood Flooring Part 3 The Finishing Touches Simply Designin Diy Wood Floors Installing Laminate Flooring Transition Strips

Tung Oil On Wood Floors A Review 2 Years Later Newlywoodwards Diy Wood Floors Sanding Wood Floors Refinishing Hardwood Floors

How To Install Pre Finished Engineered Flooring This Old House Engineered Flooring Wood Floor Installation Old Houses

Part 2 Is Nail Down Installation The Best Unique Wood Floors Blog Wood Floors Flooring Installing Hardwood Floors

How To Install Laminate Flooring The Home Depot Blog Installing Laminate Flooring Laminate Flooring Flooring

How To Chemically Strip Wood Floors Refinish Wood Floors Refinishing Hardwood Floors Wood Floors

How To Clean Engineered Hardwood Floors With Images Engineered Hardwood Engineered Wood Floors Engineered Hardwood Flooring

How To Install Laminate Flooring The Home Depot Blog Installing Laminate Flooring Hardwood Floors Flooring

Fix A Squeaky Floor Fix Squeaky Floors Squeaky Floors Old Wood Floors

Advanced Laminate Flooring Advice Installing Vinyl Plank Flooring Laminate Flooring Diy Laying Laminate Flooring

Tile Bucket Slide Challenge In 2020 Wood Like Tile Flooring Rustic Wood Floors

Guide To Installing Laminate Flooring In 2020 Installing Laminate Flooring Laminate Flooring Installing Hardwood Floors

What This Family Did With Wooden Pallets Is Amazing Repurposed Pallet Wood Wood Pallet Flooring Pallet Floors

To Remove Years Worth Of Carpet Glue And Ground In Dirt On A Hardwood Floor Before Sanding Use 50 A Carpet Glue Hardwood Floors Refinishing Hardwood Floors

Patch Gaps In Laminate Floors Madness Method Laminate Flooring Laminate Flooring Diy Diy Flooring

An Integrated Doormat Ensures That Grit And Dirt Isn T Brought Into The House We Used An Oak Boarder To Frame The Ma Oak Parquet Flooring Flooring Wood Floors

